Add New Order
Outward Order List
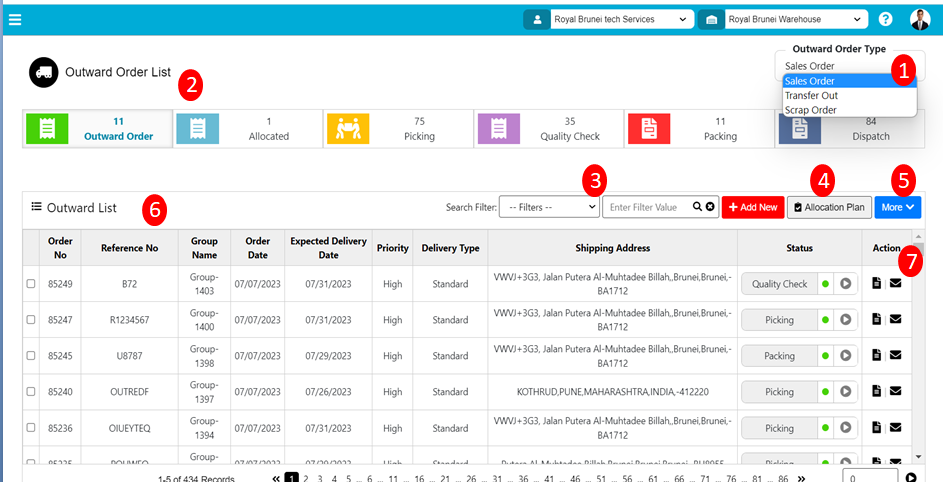
To view Outward Order list, use the "Outward" menu and click the "Add New" button. This will open the new project wizard dialog. Based on Outward Order Type user able to view the order List also order status count display.
The various parts of this dialog are:
- Outward Order Type: Specify the type of the Outward Order- Sales Order, Transfer Out, Scrap Order
- Order status count display: Outward Order, Allocated, Picking, Quality Check, Packing, Dispatch
- Search filter: Search order by Order No, Order Reference No, Group Name, Priority, Delivery Type, Shipping Address, Status
- Allocation Plan: System suggest the location, pallet and quantity the SKU need to Pick.
- More: contains two options
5.1 Cancel Order: Before Picking user able to cancel the order.
5.2 De-Allocated: After Allocation user will be able to De-allocate the order.
- Outward Order List : This List contains Order No, Reference No, Group Name, Order Date, Expected Delivery Date, Priority, Delivery Type, Shipping Address, Status, Action.
- Action : Action contains Document and Communication.
Outward Order List data should display
Add New Sales Order
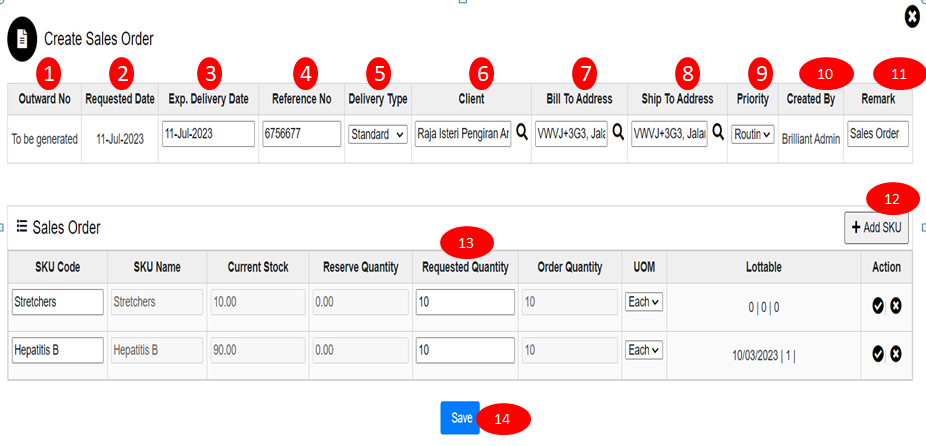
To add New Outward Order list, use the “Outward” menu click the "Add New" button. This will open create Sales Order wizard dialog.
The various parts of this dialog are:
- Outward No: After saving the Sales order system will generate a order no i.e outward order number.
- Requested Date: By default, system will take current date.
- Exp. Delivery Date: It is a expiry date of the order to be delivered.
- Reference No: Every order should have unique reference no.
- Delivery Type: Contains two type Standard and Urgent.
- Client: When clicked on search icon clients name will display. User need to select one client.
- Bill To Address: After client selection by default Address should display.
- Ship To Address: After client selection by default Address should display.
- Priority: Order contains 3 priorities- Routine, Urgent, Very Urgent.
- Created By: Login User name will display.
- Remark: User can enter Remark text if any.
- Add SKU: When clicked on Add SKU, SKU list will be displayed. Need to select SKU from list. After selection SKU Details will display.
- Requested Quantity: Against SKU user need to enter Requested Quantity and click on save SKU button. Same process needs to repeat for all SKUs.
- Save: After adding SKU in order user need to click on Save button.
Sales Order will be created and displayed in Outward Order List of Sales Order.
Add New Transfer Out Order
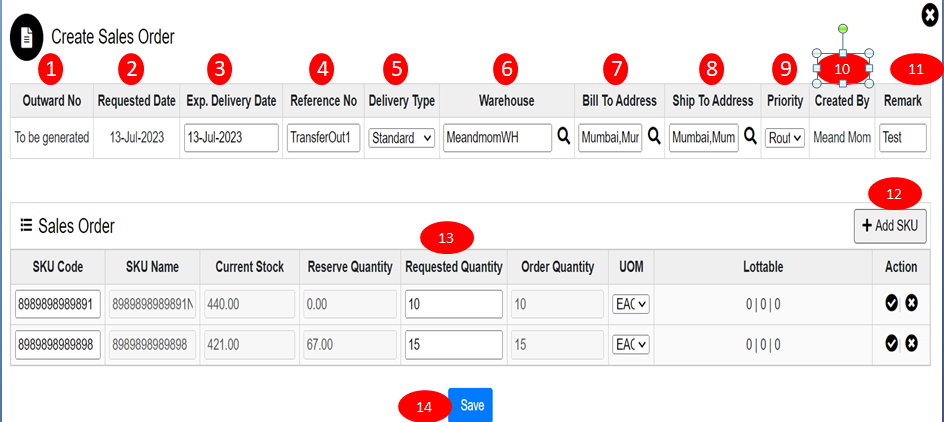
To add New Transfer Out Order, use the “Outward” menu select the Order Type as Transfer Out then click the "Add New" button. This will open create Sales Order wizard dialog.
The various parts of this dialog are:
- Outward No: After saving the order system will generate Outward No.
- Requested Date: By default, system will take current date.
- Exp. Delivery Date: When clicked on text box system will display calendar from that user will be able to select the date..
- Reference No: Every order should have unique reference no.
- Delivery Type: Contains two types Standard and Urgent.
- Warehouse: When clicked on search icon warehouse name will display expect warehouse display in filter. User need to select one warehouse.
- Bill to Address: After warehouse selection by default Address should display.
- Ship to Address: When clicked on search icon address list should display. User need to select one address.
- Priority: Order contains 3 priorities- Routine, Urgent, Very Urgent.
- Created By: Login User name will be displayed.
- Remark: User can enter Remark text if any.
- Add SKU: When clicked on Add SKU, SKU list will be displayed. Need to select SKU from list. After selection SKU Details will be displayed.
- Requested Quantity: Against SKU user need to enter Requested Quantity and click on save SKU button. Same process needs to repeat for all SKUs.
- Save: after adding SKU in order need to click on Save button.
Transfer Out Order will be created and display in Outward Order List of Transfer Out Order.
Add New Scrap Order
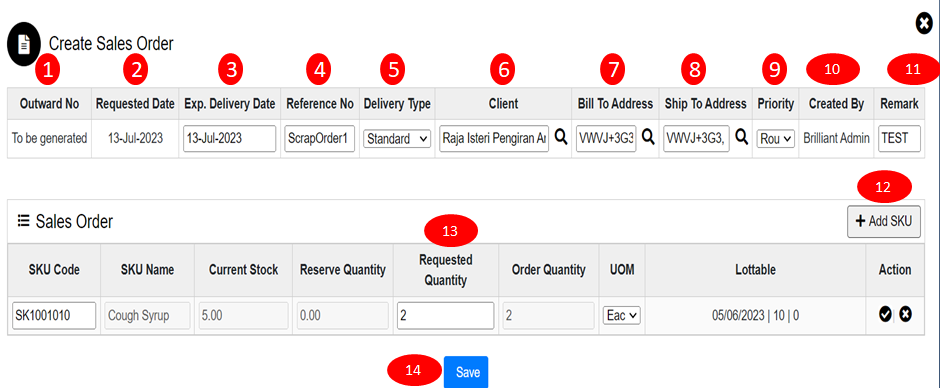
To add New Transfer Out Order, use the “Outward” menu select the Order Type as Scrap Order then click the "Add New" button. This will open create Sales Order wizard dialog.
The various parts of this dialog are:
- Outward No: After saving the order, system will generate Outward No.
- Requested Date: By default, system will take current date.
- Exp. Delivery Date: When clicked on text box system will display calendar from that user able to select date.
- Reference No: Every order should have unique reference no.
- Delivery Type: Contains two type Standard and Urgent.
- Client: When clicked on search icon client name will be displayed. User need to select one warehouse.
- Bill To Address: After client selection by default Address should display.
- Ship To Address: When clicked on search icon address list should be displayed. User need to select one address.
- Priority: Order contains 3 priorities- Routine, Urgent, Very Urgent.
- Created By: Login User name will display.
- Remark: User can enter Remark text if any.
- Add SKU: When clicked on Add SKU, SKU list will be displayed. Need to select SKU from list. After selecting SKU Details will be displayed.
- Requested Quantity: Against SKU user need to enter Requested Quantity and click on save SKU button. Same process needs to repeat for all SKUs.
- Save: After adding SKU in order need to click on Save button.
Scrap Order will be created and display in Outward Order List of Scrap Order.
Created with the Personal Edition of HelpNDoc: Maximize Your Reach: Convert Your Word Document to an ePub or Kindle eBook